Friday 9 June 2017

Assessment three: 
Reflection

As a construction management student in my final year of study, there are very few instances where we are required to design; merely look at management techniques and investigate construction methodology. We are in the age of technology, computers have never been more influential and construction is not just seen as the end product, but is rather interspersed with design through BIM and ECI, as one example. For this reason it's of crucial importance for interdisciplinary relationships to flourish to deliver a superior product to the client in a very competitive environment.

Continuing on from the bowl tutorial, it's important to see how this structure fits into the design and construction space. The bowl is spherical in shape, uniform in profile and traditional in design. It's formed by aluminium, a material common in construction (framing), and in my opinion, a material which exemplifies that raw material, industrial style. I have selected four construction related structures to situate my bowl with, and a small explanation following.


National Centre for the Performing Arts, China
Often referred to as the 'Giant Egg', the facade of this building is constructed with primarily titanium and glass. The centre is unique as it plays off the reflection of the building on the man-made lake to give the illusion of completeness. The egg shape is traditionally very strong and distributes the external forces along the shell to the ground. The concave-d shadow is representative of the bowl, with the titanium shell similar in appearance to the aluminium.

Aldar Properties Headquarters, Abu Dhabi
The first round building in the Middle East and is a testament to the golden ratio; the amount of the circle in the ground in direct proportion to the size. The building employs the structural diagrid facade composed of steel and glass, thus allowing maximum floor space inside. The round shape is highly symbolic of perfect symmetry, harmony, unity of all the components and strength. It is this shape which makes the structure of the bowl, and a visually appealing product which appears the same from all angles.


The Atomium, Brussels Belgium
The Atomium was originally built in 1958 and despite the ill proportion, it stands over 100m tall and houses a restaurant in the top section. From a scientific perspective, this building depicts nine iron atoms in a body centred cubic unit cell of an iron crystal, and at the time of construction was made of aluminium. Upon later renovations this was changed to stainless steel which itself is primarily iron. The spherical balls are all connected together in a symmetrical pattern, representing the perfect way all elements within the universe are created at a molecular level. The shape of the bowl is simple and easy yet it's been around for so long because it's effective and works, as clear in buildings and monument type structures.

Radio Telescope, China 
Located in China's Guizhou Province, the construction of the world's largest radio telescope was completed in 2016 as the last panel was installed in the 500m wide dish built into the mountain side. Again, the metallic material is similar to the bowl, and the shape is identical, however in this instance the shape in not for aesthetic purposes but rather functional purposes to scan the universe for frequency waves. The dish has revolutionised the once traditional shape to prove that we can learn from the past to move into the future.


Tuesday 6 June 2017

Assessment three: 
Tutorial - The bowl

The bowl is a fairly basic, uniform shape which requires a number of skills and techniques to be created efficiently. I have selected this task because these techniques provide a strong foundation for metal working, and at the end of the task you end up with something that is actually useful. As I have already made this piece, this tutorial will guide you through the process, with the aid of additional resources I have created. The end product should hopefully look something similar to below:


Step one:
  • Before we begin we need to first identify the tools needed to create the bowl. I have included photos and labels of all the tools I used however others might be useful if these are not available at the time.
                                  Tin snips                           Nylon point mallet and timber mould

                        Body mechanic hammer                           Nylon edge mallet


                    Round dolly male component                  U-dolly male component

 
 English Wheel

Step two:
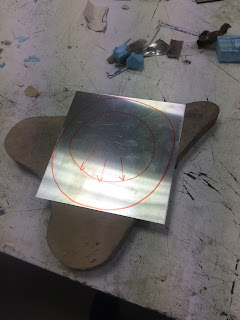
  • Select your piece of sheet metal and decide on the size of the circle. Obviously the larger the circle the larger the bowl. Find the centre of the sheet by dissecting the metal with two opposing diagonal lines as shown in the photo. From here you can scribe the circumference ready for the next stage of the process.

Step Three:
  • Once the circle is complete, using the tin snips, trim around the edges carefully so as not to ruin the perfect shape or remove too much material. Try to not waste material if possible. Then similar to the photo, draw an inner circle purely to act as a guide for yourself to know where to begin the forming. 
  • As this secondary example was created purely for this tutorial, I didn't trim the edges, a classic example of 'do what I say not what I do.' The arrows seen here are the direction which the mallet is to be struck.

Step Four:
  • Set the metal up on the timber mould over the hollowed section. Using the nylon pointed mallet, strike the metal along the inner line. This needs to be forceful enough to create a ripple or wave rather than just an indentation. The smaller the inner circle the deeper the bowl will be. This process can be quite tricky and will take some getting used to. If the ripple effect is not quite forming or you make a mistake don't give up, the process is only just beginning and the imperfections will be fixed further down the track. Bare in mind that in the video I'm only using one hand as the other is recording, not ideal and two hands should be used for support and safety.

  • That ripple effect is a permanent deformation and with that comes strength and rigidity, and the beginning stages of the bowl shape. Continue this method along the whole circumference of the inner circle. As you can see, the shape won't be perfect, but at this stage that's not important. As metal is deformed, the strength increases drastically, you will notice how rigid the bow is even at this early stage.

Step five:
  • The ripples are now surrounding the edges but these need to be flattened and smoothed out. Transferring the piece to the sandbag, and at a slight angle, use the large round end of the nylon mallet and reasonable force to hammer out the waves. Continue this too around the whole circle till happy.
Step six:
  • Once again using the large round end of the nylon hammer, hammer out the centre down into the sand bag or wooden mould. The sandbag provides more support and less risk however the wooden mould is faster, comes down to personal preference. I did a bit of both for mine, and you don't want to risk thinning of the metal too much that it splits. Case in point:

  • Continue this process as seen in the video until you get the depth required.


  • Working from the centre out, using the round end of the nylon hammer work the metal in concentric circles. Using the basis that the centre is the bottom point, try to get some uniformity in the metal, and as you work outwards the bowl recess will form deeper and deeper. I took my time during this stage to get an extremely smooth curve, and the more time you spend the better the result. If there are large deformations, you can use the cast metal dolly forms and the body mechanic hammer to get these out however be careful as the metal on metal can damage the surface. I didn't require this as I spent so much time with the nylon mallet and the sand bag.

Step seven:
  • Now that 95% of the bowl shape has been formed, it's time to get the surface perfect. Using the English Wheel (when you find it available for use), make sure the bottom wheel selected (anvil wheel) is the round profile. These can easily be replaced simply by lifting them out. Using a back and forth motion, play around with the fit, a tighter fit will stretch the metal more and deform it easily. A medium pressure is sufficient if the surface is similar to mine in the image above. The English wheel does the same job as the body mechanic hammer however for larger areas and more efficiently. The pressure can be adjusted by spinning the bottom handle which raises and lowers the bottom wheel whilst the top wheels stays still.
  • The more the bowl is rolled, the better the surface texture is, so this could take a while. I went in on a quite day and achieved the above finish after around half an hour. You will notice that a really glossy sheen is achieved and a uniform round shape. Make sure to not just roll in the one spot and working methodically, make your way around the whole bowl.
Step eight:
  • The final step is of course the most simple, and that's finishing. Firstly, the edges of the bowl might still be slightly rough from trimming and therefore need to be filed and sanded down. There are large boards with sandpaper attached in the workshop which can be secured in the vice and used to twist and slide the bowl along to achieve a level edge. There is also brasso in the workshop which is to be applied with a cloth or rag and rubbed into the surface. This will leave a dark residue which then needs to be wiped off, leaving behind a gleaming surface for a very useful and quality bowl. Final photos of the finished product can be seen below.


Sunday 4 June 2017

Week fourteen: 
Ferrari finalised and submitted

The Ferrari 250 GTO is at present the most expensive car ever produced, not surprising with limited production run of 39 cars. As seen in the photo below (the 330 GTO model with a larger engine), the body work of this car is nothing short of a masterpiece. The car has immaculate lines, a sweeping body, artfully engineered for performance yet balanced with a pleasing aesthetic. Every little detail of this car was meticulously planned, crafted, tested, perfected and implemented, and serves a specific purpose. This was the inspiration for our major project over the course of the last month of classes.


Working within groups, we divided the body of the car to metal form during class. The group consisted of four people: Myself, Henry Wever, Hepeng Ouyang and Marco Lei. I selected the upper most parts of the car, seen in the (extremely rough) screenshot below. 


  • Our group attended the final class to put our work together one last time. Before we could do this some last minute jobs needed to be done. My metal in particular was fairly shiny, however did have a layer of grime and worked colour after several weeks of rolling on the English Wheel. I found a can of brasso in the workshop and applied with a piece of paper towel in circular motions, giving a dirty appearance. I then wiped off the residue on the surface with another paper towel in similar fashion and achieved a real shine. It's hard to see the difference with the lighting captured by the phone camera however the second photo below shows a test piece with a much better finish in the centre of the metal.
  • Once our pieces were finished to a high quality, we were ready to assemble all the components. One team member was running late and had some small errors to fix up so we started without him. As you can see, we removed the tape we used to divide the sections and lined the pieces up. I feel my roof and windscreen parts fit pretty well with the bonnet; he achieved a nice finish as well.


  • Once our fourth team member had finished we were ready to complete the process. I feel that the side pieces weren't quite true to the shape of the Ferrari however overall the shell was a solid attempt. The front left panel was too block like and should have had a more rounded profile, while the back left panel was slightly too flat. With that being said, coming from a group half the required size, who had started late, we did extremely well to finish on time. Coming from a construction course, working with architecture and landscape architecture students, they obviously have more labor intensive schedule, so haven't been able to attend every class like myself. I believe we came together to bring all of our strengths to the table, and to work to a common goal, which is ultimately what the assignment was about.


  • From my previous blog post, I mentioned an additional task I was hoping to undertake. I had a bit of spare time this afternoon so decided to spray paint my section Ferrari red. Although the weather wasn't ideal; rain, cold, windy, I wanted to do this to give an impression of the actual car as it would look. From the stock photo at the top of the post, along with the windscreen there is also a glass panel on the roof. I decided to tape these off as negative space to represent the glass. I would have then primed the surface if the primer at home hadn't hardened, so instead I sprayed three coats of a sealer/topcoat blend with a short drying time in between.
  • Once the paint was touch dry, I peeled the tape off and cleaned up any paint which seeped under the edge. The complete photos can be seen below. The car is so iconic, it would be hard to do the original manufacturers justice. However with that being said, I feel that I encompassed a lot of the curves and shapes very similar to the original design, and in that regard produced a successful product. I thoroughly enjoyed working over the past semester towards this end assessment and learnt a lot of valuable skills at the same time.